Creating SCADA-like user interfaces for Node-RED with SCADAvis.io

1. Add the UI-Builder Package
  • Add the "node-red-contrib-uibuilder" package to Node-RED.
    See documentation for UI-Builder here.
    Add the uibuilder node to the flow.
2. Edit the UI-Builder source files
  • Double click the node. Click the "Edit Source Files" button.
    Change the index.html file to:
    <!doctype html> <html lang="en"> <head> <meta charset="utf-8"> <meta http-equiv="X-UA-Compatible" content="IE=edge"> <meta name="viewport" content="width=device-width, minimum-scale=1, initial-scale=1, user-scalable=yes"> <title>uibuilder jQuery example</title> <meta name="description" content="Node-RED uibuilder - Example using jQuery"> <link rel="icon" href="./images/node-blue.ico"> <!-- OPTIONAL: Normalize is used to make things the same across browsers. Index is for your styles --> <link rel="stylesheet" href="../uibuilder/vendor/normalize.css/normalize.css"> <link rel="stylesheet" href="./index.css" media="all"> <script src="https://scadavis.io/synoptic/synopticapi.js"></script> </head> <body> <!-- The "app" element is where the code for dynamic updates is attached --> <div id="app"> <h1> Welcome to UIbuilder for Node-RED </h1> <p> This is an example of using uibuilder with jQuery. If you open the developer console, you will see some debug output. You can also see some dynamic data updating below, thanks to JQuery. Additional information may be available in the <a href="https://github.com/TotallyInformation/node-red-contrib-uibuilder/wiki/Example:-JQuery">WIKI</a> </p> <p> Please see the README for the <a href="https://github.com/TotallyInformation/node-red-contrib-uibuilder">node-red-contrib-uibuilder</a> node for details on how to use uibuilder. </p> <h2>Dynamic Data (via JQuery)</h2> <p>UIBuilder Front-End Version: <span id="feVersion"></span></p> <p>Websocket State: <span id="socketConnectedState"></span></p> <p>Messages Received: <span id="msgsReceived"></span></p> <p>Control Messages Received: <span id="msgsControl"></span></p> <p>Messages Sent: <span id="msgsSent"></span></p> <p>Last Message Received:</p> <code id="showMsg"></code> <p>Last Control Message Received:</p> <code id="showCtrlMsg"></code> <p>Last Message Sent:</p> <code id="showMsgSent"></code> </div> <div id="scadavis_display1"></div> <!-- These MUST be in the right order. Note no leading / --> <!-- REQUIRED: Socket.IO is loaded only once for all instances Without this, you don't get a websocket connection --> <script src="../uibuilder/vendor/socket.io/socket.io.js"></script> <script src="../uibuilder/vendor/jquery/dist/jquery.min.js"></script> <!-- REQUIRED: Sets up Socket listeners and the msg object --> <!-- <script src="./uibuilderfe.js"></script> //dev version --> <script src="./uibuilderfe.min.js"></script> <!-- //prod version --> <!-- OPTIONAL: Put your custom code in here --> <script src="./index.js"></script> <script> var substationsynoptic = new scadavis({ container: "scadavis_display1", iframeparams: 'frameborder="0" height="500" width="1000"', svgurl: "https://raw.githubusercontent.com/riclolsen/displayfiles/master/kor1.svg" }); substationsynoptic.zoomTo(0.5); substationsynoptic.on("click", function (event, tag) { var v = substationsynoptic.getValue(tag); if (event.currentTarget.id === "TAPUP") substationsynoptic.setValue(tag, v + 1, false, false); else if (event.currentTarget.id === "TAPDOWN") substationsynoptic.setValue(tag, v - 1, false, false); if (event.currentTarget.id === "XCBROPEN") substationsynoptic.setValue(tag, false, false, false); else if (event.currentTarget.id === "XCBRCLOSE") substationsynoptic.setValue(tag, true, false, false); if (v === true) substationsynoptic.setValue(tag, false, false, false); else if (v === false) substationsynoptic.setValue(tag, true, false, false); }); uibuilder.onChange('msg', function (newVal) { for (i = 0; i < newVal.payload.length; i++) substationsynoptic.storeValue(newVal.payload[i].tag, newVal.payload[i].value); substationsynoptic.updateValues(); }); uibuilder.start(); </script> </body> </html>
3. Remove index.js from Source Files
  • Remove or make empty the original index.js file.
4. Add JQuery.
  • Use the "Manage front-end libraries" button to add "jquery".
5. Insert an Inject node in the flow.
  • Connect the output to the UI Builder input. Configure the Inject to JSON payload.
    Add tagged data payload as in this example:
    
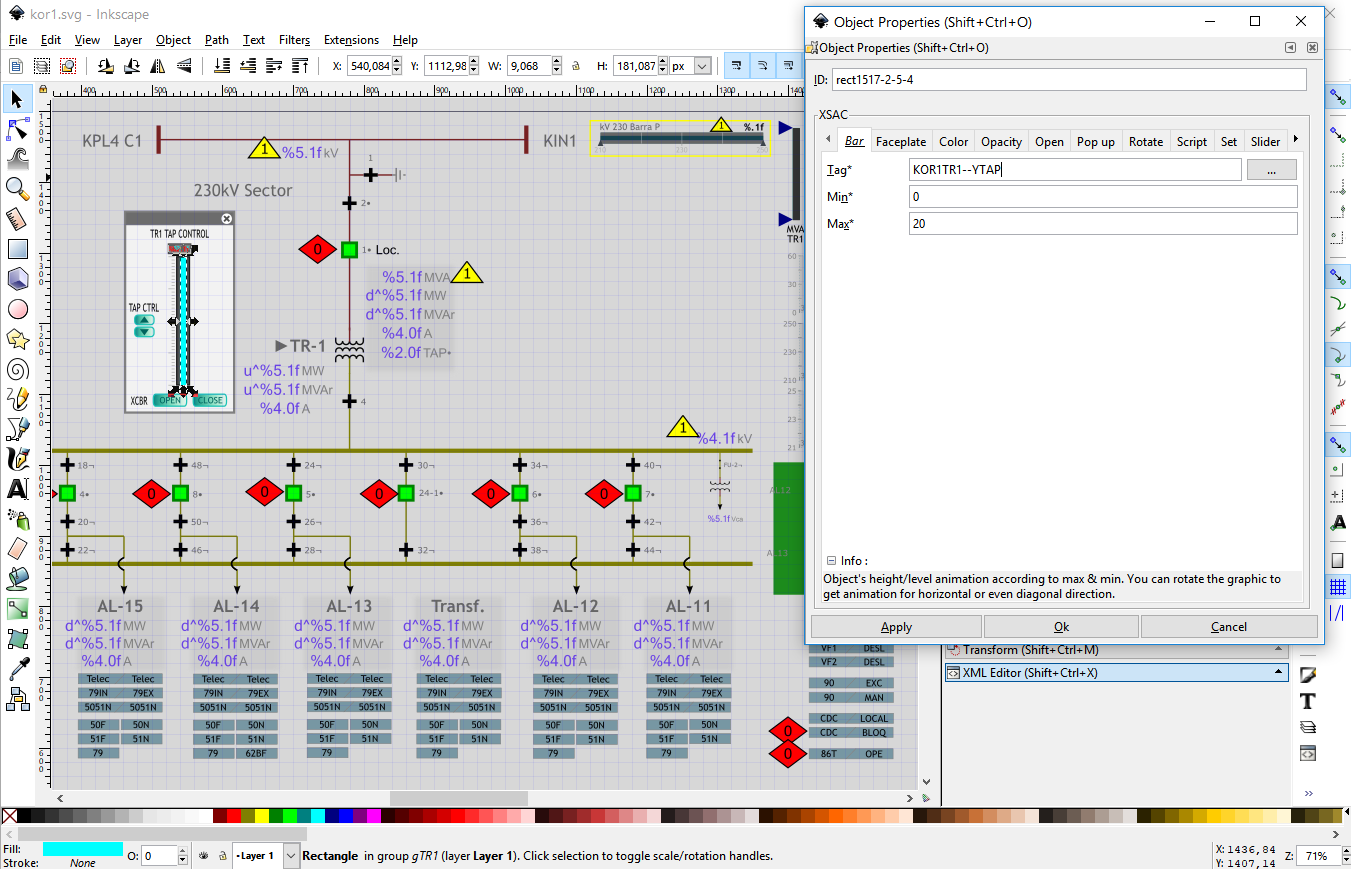
        [{  "tag": "KOR1TR1--YTAP",
            "value": 9
        },{ "tag": "KOR1XSWI1",
            "value": false
        },{ "tag": "KOR1XSWI2",
            "value": true
        },{ "tag": "KOR1XSWI4",
            "value": true
        },{ "tag": "KOR1XSWI6",
            "value": true
        },{ "tag": "KOR1XSWI8",
            "value": true
        },{ "tag": "KOR1XSWI10",
            "value": false
        },{ "tag": "KOR1XSWI12",
            "value": true
        },{ "tag": "KOR1XSWI14",
            "value": true
        },{ "tag": "KOR1XSWI16",
            "value": false
        },{ "tag": "KOR1XSWI18",
            "value": true
        },{ "tag": "KOR1XSWI20",
            "value": true
        },{ "tag": "KOR1XSWI22",
            "value": false
        },{ "tag": "KOR1XSWI48",
            "value": true
        },{ "tag": "KOR1XSWI50",
            "value": true
        },{ "tag": "KOR1XSWI46",
            "value": false
        },{ "tag": "KOR1XSWI24",
            "value": false
        },{ "tag": "KOR1XSWI26",
            "value": true
        },{ "tag": "KOR1XSWI28",
            "value": false
        },{ "tag": "KOR1XSWI30",
            "value": true
        },{ "tag": "KOR1XSWI32",
            "value": true
        },{ "tag": "KOR1XSWI34",
            "value": true
        },{ "tag": "KOR1XSWI36",
            "value": true
        },{ "tag": "KOR1XSWI38",
            "value": false
        },{ "tag": "KOR1XSWI40",
            "value": true
        },{ "tag": "KOR1XSWI42",
            "value": true
        },{ "tag": "KOR1XSWI44",
            "value": false
        },{ "tag": "KOR1TR1-2XCBR5201",
            "value": true
        },{ "tag": "KOR1XCBR2",
            "value": true
        },{ "tag": "KOR1XCBR3",
            "value": true
        },{ "tag": "KOR1XCBR4",
            "value": true
        },{ "tag": "KOR1XCBR8",
            "value": true
        },{ "tag": "KOR1XCBR5",
            "value": true
        },{ "tag": "KOR1XCBR2401",
            "value": false
        },{ "tag": "KOR1XCBR6",
            "value": true
        },{ "tag": "KOR1AL11TC",
            "value": false
        },{ "tag": "KOR1AL11RREC",
            "value": true
        },{ "tag": "KOR1AL11TC",
            "value": true
        },{ "tag": "KOR1AL11PSTI",
            "value": true
        },{ "tag": "KOR1AL12TC",
            "value": false
        },{ "tag": "KOR1AL12RREC",
            "value": true
        },{ "tag": "KOR1AL12TC",
            "value": true
        },{ "tag": "KOR1AL12PSTI",
            "value": true
        },{ "tag": "KOR1AL13TC",
            "value": false
        },{ "tag": "KOR1AL13RREC",
            "value": true
        },{ "tag": "KOR1AL13TC",
            "value": true
        },{ "tag": "KOR1AL13PSTI",
            "value": true
        },{ "tag": "KOR1AL14TC",
            "value": false
        },{ "tag": "KOR1AL14RREC",
            "value": true
        },{ "tag": "KOR1AL14TC",
            "value": true
        },{ "tag": "KOR1AL14PSTI",
            "value": true
        },{ "tag": "KOR1AL15TC",
            "value": false
        },{ "tag": "KOR1AL15RREC",
            "value": true
        },{ "tag": "KOR1AL15TC",
            "value": true
        },{ "tag": "KOR1AL15PSTI",
            "value": true
        },{ "tag": "KOR1AL16TC",
            "value": false
        },{ "tag": "KOR1AL16RREC",
            "value": true
        },{ "tag": "KOR1AL16PSTI",
            "value": true
        },{ "tag": "KOR1AL17TC",
            "value": true
        },{ "tag": "KOR1AL17PSTI",
            "value": true
        },{ "tag": "KOR1AL17RREC",
            "value": true
        },{ "tag": "KOR1ALTFTC",
            "value": true
        },{ "tag": "KOR1ALTFPSTI",
            "value": true
        },{ "tag": "KOR1ALTFRREC",
            "value": true
        },{ "tag": "KOR1AL11MW",
            "value": 5
        },{ "tag": "KOR1AL12MW",
            "value": 7
        },{ "tag": "KOR1AL13MW",
            "value": 8
        },{ "tag": "KOR1AL14MW",
            "value": 4
        },{ "tag": "KOR1AL15MW",
            "value": 5
        },{ "tag": "KOR1AL16MW",
            "value": 12
        },{ "tag": "KOR1AL17MW",
            "value": 10
        },{ "tag": "KOR1AL11MVAR",
            "value": 0.3
        },{ "tag": "KOR1AL12MVAR",
            "value": 0.4
        },{ "tag": "KOR1AL13MVAR",
            "value": 0.5
        },{ "tag": "KOR1AL14MVAR",
            "value": 0.2
        },{ "tag": "KOR1AL15MVAR",
            "value": 0.1
        },{ "tag": "KOR1AL16MVAR",
            "value": 0.2
        },{ "tag": "KOR1AL17MVAR",
            "value": 0.3
        },{ "tag": "KOR1TR1MW",
            "value": 50
        },{ "tag": "KOR1TR1MVAR",
            "value": 1.5
        },{ "tag": "KOR1KV230",
            "value": 231
        },{ "tag": "KOR1KV23",
            "value": 23.6
        }]                  
      
6. Deploy and Open UI
  • Deploy the flow.
    Open UI-Builder page http://localhost:1880/uibuilder.
    Click the Inject button in the Node-RED flow to deliver data to the UI-Bulder page.
7. Develop your own displays
  • Change the code and use the SCADAvis.io Synoptic Editor to create new displays.
SCADAvis.io Synoptic Editor
SCADAvis.io Editor

Available only for Windows 10 computers in the Microsoft Store.